Pages

1. Welcome to my Programming in FreeBasic Blog!

Why Programming?

If you enjoy learning then programming is a fun hobby that is easy to get into, inexpensive, and can provide you with skills that can be used at home and in the workforce.  If you are a student, this blog  will help you learn computer programming and make sure you understand the fundamentals.

If you search the internet for software, you get the impression that any program you could possibly want has been written.  Over the following series of posts, you will see that not everything has been written. We will write a useful program that will help get the creative juices flowing.  We will also gain the skills to modify our program to work exactly how we want it to work.

HP-85A computer image from:
 http://www.hpmuseum.net/display_item.php?hw=33

My personal programming experience started in 1980 with Fortran and punch cards. No instructions were given other than copy these words onto these cards and don't make a mistake! The whole idea of programming seemed like a bit of a waste of time.  In 1983 I worked for a clinical laboratory that owned a HP-85A computer that could be programmed in Basic.  The lab had an instrument that determined blood iron levels, however the instrument results had to go through a series of manual calculations before the values were useful to clinicians.   I learned enough Basic  to write a small program that did all the calculations and printed them out on the thermal printer on the top right of the computer. I had reduced a task that would normally take an hour or more, involving lots of manual input with the potential for typing errors and needing repeated checking and rechecking, to one that could be completed in less than 10 minutes with much less need for error checking. My current job, still in a computer department, does not involve much programming but I still enjoy writing programs in various programming languages.  The intellectual challenge is better than completing a sudoku or a cryptic crossword and results in useful programs.

Why FreeBasic?

I have chosen FreeBasic (http://www.freebasic.net/) for this series of posts.  FreeBasic, as the name implies, is free to download and use.  I have found it easy to use and learn, yet powerful enough to cope with what I need. FreeBasic may not be a popular programming language, however the techniques we will cover in the following posts will be applicable to most languages.  Initially we will work on text only programs but we will move to full graphical windows based applications later.

You may never become a professional programmer but the thrill of writing a program that does what you have asked it to do is amazing.  By the way, if you do become become the next Bill Gates or Mark Zuckerberg, remember who got you started 😉.

Next Post

In the next post we will download the FreeBasic compiler, download an editor to write our code in, and set up our directories so everything is easy to find and manage.  We will also write the mandatory "Hello World" program to make sure everything is set up correctly.

Please feel free to leave a comment and see you in the next post.

2. Install FreeBASIC

My computer environment

My computer environment is pretty standard.  I have a Surface Pro 3 running Windows 10.  I prefer Chrome as a browser and try to use portable apps (http://portableapps.com/) where possible. When used with services like Google Drive, portable apps give you  a system that is easy to upgrade or replace.  Simply copy your portable applications onto your new computer and your good to go.

Compilers

Computers use machine code, written in binary (1's and 0's), to instruct the CPU what to do.  The sequences of 1's and 0's are difficult to work with so Assembly code has been created. The binary sequences are replaced by short mnemonics. Assembly code is easier for humans to read and write.  The Assembly code was put through an assembler to convert it into machine code so the computer could follow the instructions. Although easier to read, assembler instructions are so fundamental that it takes many assembler instructions to do anything useful.

Higher level languages such as Basic are easier again to read and can pack a lot of power in very little code.  Computers cannot understand high level languages and this is where compilers come in.  Compilers translate the high level language to machine code, that can be used by a computer.

Download FreeBASIC

The compiler we will use is FreeBASIC.  Head over to https://sourceforge.net/projects/fbc/files/ to find the compiler for your system.  I prefer not to install software on my computer so I will choose "Binaries - Windows".  This section holds compilers that you only need to copy to a directory; no installation is necessary.  Find the files with the zip extension.  If you have a 64 bit version of windows you can choose the ...win64.zip file, if you don't have a 64 bit version of Windows or are not sure, then choose the ...win32.zip file.  Your download should start within 5 seconds.

Sourceforge FreeBASIC download location

Windows specific downloads
Use the files that end in either -win32.zip or -win64.zip

Set up directory for FreeBASIC

Next up we need to set set up our computer for writing FreeBASIC programs.  I have a directory off the root of C:\ called Apps.  It's where I put all portable apps and  I have a shortcut to this folder on my desktop for easy access. I have created a new directory called Basic inside the Apps directory:  C:\Apps\Basic . You may wish to do the same.  The address bar looks like this:

Clicking on the address bar will give you C:\Apps\Basic


Leave this directory open and open another window that shows our downloads.  Double-click the downloaded FreeBASIC compiler file and Windows 10 inbuilt extraction tool will show the FreeBASIC-1.050.0-win32 (or win64  if you chose that) directory it contains inside it.  Now right-click on the directory and drag it to the newly created Basic directory.  My directory looks like this:
My directory with the 64 bit version of FreeBASIC

Renaming the FreeBASIC-1.050.0-win32 folder to FB will make working with the directory easier in the future, so let's go ahead and do that. If you double click the newly named FB directory you will find a number of subdirectories, a couple of text files, and a file called fbc.exe, you may not see the extension if you have extensions turned off in the view menu.  This last file is our FreeBASIC compiler.

Contents of FB directory
fbc.exe is the compiler

Testing our environment

Let's check that we have a working compiler. While in your Basic directory, right click and create a new Text Document and call it test.txt.  Make sure you have not selected a new Rich Text Document, this type of document contains lots of formatting instructions that will not be understood by the FreeBASIC compiler.  Open test.txt and enter the following text on the first line:
Print "Hello World"
Anything you need to type or will be output to the command prompt windows will be in a courier font in this blog; it helps make things easier to understand. Now save the file. Right click and rename the file to test.bas.  Basic programs use a .bas extension.

Now we have to get a command prompt to work inside the Basic directory that holds our compiler and our newly created basic script.  Open up a command prompt.  There are a number of ways to do this in Windows 10; you can:
  • enter 'command prompt' (without the quotes) in the search section of the taskbar;
  • press the windows key and x and select command prompt; or
  • press windows key and r and type cmd in the prompt.
You should end up with a window that looks something like this, your prompt will be different because it refers to your user name:
Command Prompt
At the prompt type:
cd c:\apps\basic\fb

When you press enter you will be taken to the directory you recently renamed and the command prompt will change display the new directory name.  At the prompt type:
fbc test.bas  
You are telling the basic compiler (fbc.exe - by the way, no need to type the .exe) to compile the script you wrote above. After a moment you will see a new file in your directory: test.exe.  If we try and run this from Windows Explorer you will see a screen flash on and then disappear - not very exciting.  Let's get back to the command prompt and type test.exe at the prompt.  Now you should get the following output:
Hello World
You have written your first program!! Give yourself a pat on the back and have a bit of a lie down. If you didn't get the expected result, go through the instructions again or leave a question below.  To finish off, you can delete both the test.bas and test.exe files, we won't need these.

I find the command prompt window text a bit too small to read comfortably.  While we have the command prompt open, firstly right click the title bar and select Properties. Select the Font tab and choose a bigger font size.  I find 16 works for me.  You can change other setting to suit you but I have left everything else alone.

Next Post

In the next post we will download an editor and rewrite our "Hello World" program again to make sure everything is set up correctly.  With the compiler set up as described above, and an editor configured by the end of the next post, we are ready to learn FreeBASIC and start programming.

Please feel free to leave a comment and see you in the next post.

3. Finish Setting up Environment

Prep Work

Go to the c:\apps\basic directory and create another directory called Projects.  You will use this later to hold the programs you write.  Create one more directory called Doc, again in the c:\apps\basic directory, to hold help files and documentation you will find helpful.

If we go back to the sourceforge site we can download the windows help file for FreeBASIC. The following link will start the download:
https://sourceforge.net/projects/fbc/files/Documentation/FB-manual-1.05.0-chm.zip/download

Extract the .chm file into your Doc directory.  If you double click the file you may get a Windows security warning.  Accept the warning and open the file.  When I open it, I get the index in the left panel but no contents on the right.
FreeBASIC Manual .chm file

This is a Windows security measure.  To see the contents you need to:
  1. close the file;
  2. right click on the file and select properties (bottom option);
  3. select Unblock and OK.
Unblock .chm file to view contents
Opening the file will now show you the contents.

While we are on the topic of help and documentation, FreeBASIC has an active forum that you can learn an enormous amount about FreeBASIC, and programming in general, from a group of dedicated people who voluntarily respond to queries promptly.  The link to the forum is:   http://www.freebasic.net/forum/  .  The site has  good search facilities and is divided into areas of interest from beginners to experts.

Code Editor

In the last post we used the default text editor, notepad, to write a simple Hello World program.  We explained that you cannot use a word processor as that will add additional formatting code in the text that the FreeBASIC compiler does not understand and will cause errors.

The text editor worked for our simple one-line program however, once we start working on larger programs, we need a tool that will make coding easier.  An integrated development environment (IDE) is such a tool and, apart from a code editor, includes help for completing code, highlighting of various parts of the code, easy compile and run functions, amongst many other features.

The editor we have chosen to use is FBEdit, currently at version 1.0.7.6c.  Sourceforge has an older version so for the latest version you will need to go to:

https://www.freebasic-portal.de/downloads/ides-fuer-freebasic/fbedit-ide-30.html

Please note the page is in German however Chrome does a pretty good of translating the page. The download is the Zip archive (2.94MB) on the right hand side of the web site.

Once downloaded, extract the file into the c:\apps\basic directory in a directory of its own.  Leave it with the same name as the archive, FbEdit1076c.  If it is ever upgraded then the new IDE with its version number will get a new directory as well.

FbEdit in its own directory
After extracting the the FbEdit1076c file the resulting directory contains a number of files and sub-directories.

FbEdit Options

The executable we are interested in is called FbEdit.exe.  Double clicking this file will open a dialog box for configuring various options:

FbEdit Path Options Dialog
At the 'Default Project Path:' prompt you can either enter ..\projects (they are two dots before \projects  - two dots means the directory directly before or above this one) or find the same directory using the '...' option button.  For 'Compiler Path:' enter ..\fb , and for 'Help Path' enter ..\Doc.  The benefit of using the .. notation rather than explicitly spelling out the exact path means that you can put the entire Basic directory onto a memory stick and FbEdit will be able to find all the bits it needs.

FbEdit Path Options filled
Accepting the directories you have nominated presents you with an option to Activate FbEdit Lite  for beginners.  It is recommend that you do NOT taking this option. The standard version has a few more options that you will use.  The menus not in the Lite version are: Format; Debug; Resource; and Tools. There are also additional options within each common menu that you will not find in the Lite version.  From a cursory scan we could not see an option to convert the Lite version to the standard version.  You could simply reinstall FbEdit and change the option when it comes up.  Of course you would lose any settings you had changed.

The next options you should adjust sits in the Options menu, is called Help Menu, and manages access to various help resources.  The first item is the Win32 help file.  A copy of the required file in chm format can be found at the following location: http://laurencejackson.com/win32/ Download the file and place a copy in the Doc directory, then change the Help Menu Option to point the the right location as shown below:

Win32 help file option

The FreeBASIC item in the above menu must be set to point to the chm file we copied across at the start of this post.  Leave the remaining two menu items as presented.

Now if we choose the Help menu in FbEdit all the help options will work for you.  If you find that you only see the left panel of the chm files, remember to the 'unblock' process shown above.  

If you have some spare time on your hands you can go through the help files.  You will find a wealth of information; of particular interest are the FreeBASIC help option and the FbEdit help option.

This post was longer that anticipated but hopefully it has resulted in an environment you can use to start programming in FreeBASIC.

Please feel free to leave a comment and see you in the next post.

4. Testing the IDE and a Fundamental Set of Instructions - Part 1

Hello World

In the last post we installed the FbEdit IDE, set up various paths, and installed help documentation. Let's now test our IDE installation to ensure it is working correctly.  Starting FbEdit should give you a screen that looks like the following.  The colors on your instance of FbEdit are dependent on the color theme you have in place  (Options - Code Editor).

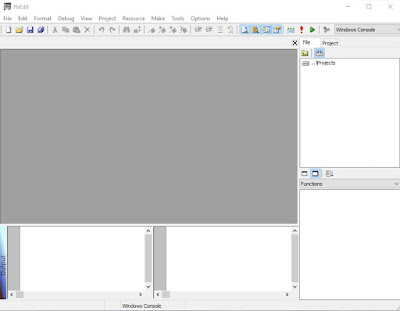
FbEdit Screen on start up

Select File then New Code File; Ctrl+N will do the same.  The large grey area changes color.  I have stayed with the default color theme so in my case it becomes a pale yellow.  This is where we will enter our code. A tab opens above this area with the filename (Untitled).bas.  The .bas is the extension FreeBASIC uses for its code files.  We haven't given our file a name yet, hence the Untitled. Click into the code area and you will see the cursor blinking and ready to take your input next to a yellow block.


Enter the following, each on a line below on a separate line of the code window (you can cut and paste if you like):
Print "Hello World"
Sleep
End

The first line prints the the text within the quotation marks, Hello World, to the windows console.
Sleep pauses the program and waits for input from the user; pressing any key will allow the program to continue.  Without this line you would see a quick flash as the console opens, prints Hello World, then immediately shuts.  The End word shuts the program cleanly - it is not strictly required here.

The colors of the text you entered change depending on the theme you have applied to FbEdit.  In the default theme you have reddy-brown for commands, red for double quotes, and blue for text.  You will get to recognise most of these as you program further.


Since this is your first time you have saved the file pressing Ctrl+S will bring up the Save As dialog box.  Pressing Ctrl+S after an initial save will save normally, rather than Save As, without asking for a name.  Change the filename to say HelloWorld.bas  The tab above your code now changes to reflect the name change.

In the Make menu we find Compile, Run, and Go options.  These options are also located on the toolbar:
Compile - converts our code into computer readable form.
Run - will run the resulting executable.
Go - does a compile followed by a run.  As this is what we want to do, press the Go option.
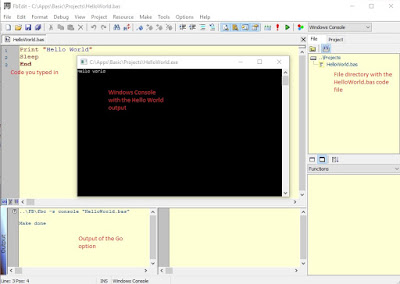
Output of Go option
The Go option starts the compiler with your file as its argument. You can see the exact command it uses in the bottom left rectangle of the image above. (The red text has been added to highlight various sections and will not come up when you select Go.)  The command it fires off is ..\FB\fbc -s console "HelloWorld.bas".  If the compiler is successful it responds with 'Make done', meaning that it has created an executable program.  The Go then runs the newly created program. A windows console opens and presents us with our Hello World message. Well done!  To recap: the IDE has been given some FreeBASIC code that has then been compiled into an executable and has run successfully. Remember, you can right click on the console title frame and choose Properties to change the size of the text if the Hello World text is too small.  Pressing any key when the focus is on the windows console will end the program and close the window.

If you exit FbEdit and go to the Projects directory you will find two files:
  1. HelloWorld.bas - containing the code you entered.  If you open this with notepad it will contain only the text you typed.
  2. HelloWorld.exe - this is the compiled code.  If you run this you will get the console program you saw when you chose the Go option.

Change to FbEdit Path Option

A quirk of FbEdit means that using ..\fb as the path option to the compiler causes FbEdit to expect the code files in the root of the Projects folder.  FbEdit will not compile code files in subdirectories of the Projects folder.  To get around this issue change the FbEdit Options - Path Options - Compiler Path to show the full path to the compiler.  In my case that is C:\Apps\Basic\FB .

Fundamental Set of Instructions for a Useful Programming

Since we now have a working compiler and IDE we can get stuck into coding.  Before we do that though, let's consider the minimum amount of a FreeBASIC we need to learn to write useful programs. I am thinking along the lines of the 80:20 rule here. I want to show you the 20 percent of FreeBASIC that you will use 80 percent of the time. This is bit not an exact science, and the selection of instructions is based on my opinion only, but hopefully it helps get to some useful programming as quickly as possible.

One caveat before we begin.  We will start off with Windows Console programming initially; the sort of program we wrote above in HelloWorld.bas.  We will work on Windows programs, with buttons and scroll bars in later lessons. It is important to get a good understanding of the basics.

The list below shows what we will be programming. It is written in English, in a form of programming shorthand that will make programming in FreeBASIC easier. Note that point 5 has an odd word getAge(date) and that word is repeated in the next section preceded by the word function.  From the name you should be able to guess that it has something to do with getting your age.  I will go through all of the following line by line to give you a clear understanding of how all of this works.

Fundamental
  1. ask “what is your name?”
  2. say “hello” name
  3. ask “when were you born” name “?”
  4. age is getAge(date)
  5. say “Hi name, at the end of 2017 you will be “ age “ years old”
  6. write name, dob, age to text file
  7. clear screen
  8. reset name, dob, age
  9. read name, dob, age from text file
  10. print name “was born on” dob “and so is “ age “ years old”
function getAge (date)
  1. calculate age from date
  2. return age

If you have programmed in any other language you will notice that Fundamental covers these programming ideas:
  • request input from screen
  • string variables
  • integer variables
  • function with parameter passing
  • simple arithmetic
  • print to file
  • read from file.

Coding Fundamental

First off go to the Projects directory and create a sub-directory called Fundamental. You may wish to delete the HelloWorld files, we won't need them, or else you can create another sub-directory called HelloWorld and move them there.


Comments

Start FbEdit and create a New Code File (Ctrl+N). Enter the following (cut and paste is fine):

'======================
'Fundamental in FreeBasic
'your name
'today's date
'======================
Replace your name with your actual name and today's date with, you guessed it, today's date.  Look carefully and you will see that each line starts with a single quote.  The FreeBASIC compiler ignores anything on a line that follows a single quote.  In the example above, the === marks along with the text, is totally ignored.  Anything following the single quote is considered a comment and is used to provide an explanation of the code that follows.  In this example, the comments give the name of the program, the language, the author, and the date the program was written. In complex programs comments are used to explain the logic to anyone who may read the program some time later.  If you visit the FreeBASIC forum you will often find posts with snippets of code. Some contain header comments, like the one here.  Others contain additional comments.  You will find a style that suits you.

If you want comments to span several lines you can use /' text '/  where anything between  the /' and '/ is considered a comment.  The example above is equivalent to:
/'
======================
Fundamental in FreeBASIC
your name
today's date
======================
'/
The benefit of using this format is that you can comment blocks of code very easily. For completeness, lines starting with Rem (short for Remark) behave the same as single quotes, however Rem must be the first command on the line. The single quote can appear anywhere on a line.

Before we get any further, press Ctrl+S and save your file in the Fundamental sub-directory. Call the file Fundamental.bas. If you try and compile and run the file you will see the flash of the console and nothing more. Our program doesn't really do anything at this stage; it is only a few lines of comments.

Input and Variables
Let's move onto the first task:
  1. ask “what is your name?”
To do this we need to type:
Input "What is your your name? "
Sleep

You will notice that once you type Input  (FreeBASIC is not case sensitive so you could type input or INPUT, or any combination of upper and lower case,to FreeBASIC it's all considered the same), the editor brings up context sensitive help.  Text within double quotes is called a String - it is a string of characters.  The compiler treats strings as special text that it does not try to interpret.  Leave a space after the question mark and before the closing double quote.

If you try and compile this code you will get an error:
Fundamental.bas(9) error 16: Expected ',' in 'Input "What is your name? "'
Build error(s)

This is basically telling us that the compiler is not happy with line 9, the line starting with Input.  It expects a ','.  Unlike print that displays text, input tells the compiler to display text, get an input from the user, and store that input in to a special location.  That location is known as a variable and is a container that can hold some data.  Our Input line doesn't specify a variable so let's create one.  To create a variable type the following below the comment section and above our Input line.  

Dim as string yourName = ""

Change the input line to say:
Input "What is your name? ", yourName

You can leave blank lines between lines of code to make the program easier to read.  Blank lines are removed from the compiled code so don't affect the way the program runs.  They are used to break up the code into logical units that make reading easier.  My screen looks like this:
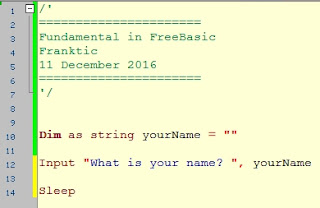
Fundamental.bas part 1
The process of creating variables starts with the Dim statement.   This command reserves a memory location to hold our data.  The as is followed by the data type.  In this case we want to hold a string of characters.  Later you will use different data types for holding data such as integers and floating point numbers.

The next word in the line, yourName, is the name we have given the variable for use within our program.  You can use any combination of characters, upper and lowercase (FreeBASIC is not case sensitive, remember?), digits, and the underscore character. Be sure to use names that will make sense when you come back to your code at a later time. Notice that I have used lower case throughout, with the exception of the N of name.  This format is called camel case, and is a format convention used widely for variable names. In camel case the first word is all lower case.  All subsequent words start with a capital letter.  All words are joined with no spaces in between.

The next part of the line, = "", preloads (or initialises) the variable with an empty string.  This is not strictly required but this convention is used in other languages and is used to ensure we start with known contents in our variables.  You can use this same idea to initialise the variable to something else, if necessary.  For instance you could have typed:

Dim as string yourName = "Nobody"

This will create a variable called yourName and put Nobody into it.

In FreeBASIC you could put a comma after the second double quote and create name another variable.  Adding more variables on the same line saves space but can get messy and difficult to read if carried too far.  I avoid this practice because I find it easier to manage variables when they are on their own lines.

If you compile and run the program now you should get no errors.  The console will open and you will be prompted for your name.  Enter your name and press enter. This will store whatever you entered into the yourName variable.  If yourName had contained another string then that string would be replaced with your input.  Press enter a second time to quit through Sleep.

As a final exercise for this post, and line 2 of the pseudo code above, enter the following line after the Input line:
Print "Hello ", yourName

If you now compile and run the program the console will ask you for your name then greet you personally. How easy was that! Next post we will continue expanding on Fundamental by looking at some calculations, functions, and work with text files.
Please feel free to leave a comment and see you in the next post.

5. A Fundamental Set of Instructions Part 2

A Fundamental Set of Instructions Part 2

Recap

In the previous post we started on a short program that promised to show you a set of instructions that you would use in most of your own programs.  The program, called Fundamental, comprises of the following steps:

Fundamental
  1. ask “what is your name?”
  2. say “hello” name
  3. ask “when were you born” name “?”
  4. age is getAge(date)
  5. say “Hi name, at the end of 2017 you will be “ age “ years old”
  6. write name, dob, age to text file
  7. clear screen
  8. reset name, dob, age
  9. read name, dob, age from text file
  10. print name “was born on” dob “and so is “ age “ years old”
function getAge (date)
  1. calculate age from date
  2. return age
In the previous post we covered lines 1 and 2 and we saw how to create a string variable and use that variable to hold some data.

Integer Variable

Line 3 asks for your birth year.  We could go for the full birth date but that is more complicated than I want to tackle in this post, so let's stick to the year only; we'll call the variable yourDob for your date of birth. Add the following line after the first Dim line:

Dim as integer yourDob = 0

As we saw in the previous post, the Dim as prepares a location for our variable.  The integer tells the Dim as that the variable will contain integers (whole numbers).  And, as before, we initialize the variable with a 0 this time.  We don't put the 0 in double quotes as we want the compiler to see it as a number not a character. To be clear 0 and "0" are viewed completely differently, the first is the number zero, the second is the character 0.

String Concatenation

Enter the following line on a new line below the  previous Print line:

Print "What year were you born, " + yourName ;

This new line shows how we add two strings together.  The + symbol concatenates the strings "What year were you born, " with yourName.  You can join multiple strings together on the one line and even assign them to a new string variable.  For instance, you could write the following:

Dim as string a = "Hello "
Dim as string b=  "World "
Dim as string c= ""

c = a + b
print c

to give the familiar Hello World message. The semicolon after yourName tells the compiler not to advance the cursor to the next line but to continue from this point.  You will get the idea when you run the code below.

We have asked for a year of birth but not actually requested any input so let's add the following line after the second print:
Input ; yourDob

The semicolon after the input in this line adds a "?" character and  waits for your input.  So the two new lines, apart from declaring our variable yourDob with the Dim as statement, should look like:

Print "What year were you born, " + yourName ;
Input ; yourDob

You can compile your code now and see what it does.  Have a play with the semicolons to see what effect they have on line breaks and question marks.

Fundamental so far

Function

Often when programming we need to write a block of code that performs a discrete action.  When the block of code simply performs an action and does not return any data that block is known as a procedure.  When the action returns a value then the block of code is known as a function.

To illustrate this concept let's look at our program.  We now have yourDob and want to know how old you will be at the end of 2017.  (I don't know how you feel about it but 2016 has flown past!) This is a simple calculation where you obviously subtract yourDob from 2017.  Let's write it as a function so we get an understanding of how functions work.

Below Sleep add the word End to signify the end of the program.  Now on a new line below that add the following lines:

Function getAge (age as Integer) as Integer
     Dim as integer calcAge = 0
     
     calcAge = 2017 - age

     return calcAge
End Function

Let's work our way through this bit of code.  The word Function and tells the compiler that we are writing a function, (who would have guessed!). The next word getAge is the name of the function.  Functions, as explained earlier, perform a discrete action so often have verbs as names. The brackets surround a new integer variable called age.  When we invoke, also known as calling, the function we will be passing the variable yourDob.  Function getAge will then give age the value in yourDob so it needs to be of the same variable type.  Finally we have, as Integer; this refers to the function getAge and the value it will send back.  Since Functions return values, the compiler needs to know what data type will be returned.

The Dim line should now make sense to you; we are creating an integer variable called calcAge and setting it to 0.  The next line is our calculation, again pretty self explanatory.  The return calcAge line tells the compiler that we need to send back the value of calcAge to the calling line. Note that the data type for calcAge is the same as the that for Function getAge as we have instructed. The last line simply ends the function.


The final line we need to add to our program is one that declares the function to the compiler.  This is placed at the top of the program and above the Dim statements.  It needs to appear before you use the function.  The line is as follows:
Declare Function getAge (age as Integer) as Integer

Fundamental including function


The program compiles and runs normally but you may be surprised to find that the code for Function getAge does not appear to do anything.  That is because we have not called or invoked the function.  To call the function you need to add the following line after yourDob input line:

Print
Print "Hi " + yourName + ",  at the end of 2017 you will be "_
+ Str(getAge(yourDob))+ " years old."

There are a couple of concepts in this line that we need to focus on.  The first Print statement gives us a line break after the previous input so that the input does not run into the text we want to display next.  The start of the next line should be well understood until we get to the  underscore character.  This is used by FreeBASIC to continue long lines onto the next line.  It acts as a continuation command.  The next statement needs you to pay attention - Str(getAge(yourDob)).  Inside the first set of brackets you will see getAge(yourDob).  A function is called by naming it and giving it any parameters it needs.  In this case we pass yourDob to the getAge() function by putting it in the second set of brackets.  The function getAge will then do its arithmetic using yourDob and return calcAge.  If you had entered 1980 for yourDob then the result returned would be 37.  The number 37 is a number and cannot be added to a string. We need to convert the 37 to a string for the concatenation to be work, and that is where the FreeBASIC built in function Str() comes in.  Given a number it returns the number as a string of characters.  We can then use it to complete the sentence we wanted to create.  Go ahead and compile and run the program.

Fundamental program at end of  Post
This is a simple program so we could have written the code within getAge() in line with the rest of our code.  Having a function gives us many benefits, among them:

  1. the main part of the program is shorter and easier to read.
  2. we can reuse the function in any other program that needs to use that calculation.  Simply cut and paste the function.  You need to remember to declare it prior to using it.
  3. finding errors becomes easier.  If the age we get back is incorrect we know we need to check the logic in the function.
  4. programming becomes easier and can be shared within a team of programmers through the use of function and procedure stubs.  Essentially a stub is a simply function that does not contain any logic but returns a value as if it did. It allows us to write our main program, call functions, but not have to worry about the details of how the function works. We'll cover this aspect in a future post.


In this post we continued working on Fundamental.bas.  We know how to ask for input and display text.  We know how to concatenate strings and we know how to convert a number into a string so it can be part of a larger string. We know how to write a function and have it return the result of a calculation.  Next post we will look at reading and writing text files.  

Between posts play around with some of the commands you have been shown.  If you cause errors, find what you changed and understand why the error occurred.  Try writing other programs based on the commands shown here. This sort of experimentation will help you understand what is going on much better than simply reading the text. You cannot learn to play the guitar without practice no matter how many books you read about guitars.
Please feel free to leave a comment and see you in the next post.

6. A Fundamental Set of Instructions Part 3

A Fundamental Set of Instructions Part 3

Recap

In the previous post we continued with Fundamental and demonstrated integer variables, string concatenation and functions.  In this post we will work with text files.  The ability to store information on your hard disk between runs of a program is quite powerful.  Some of the things you can store are:

  • a program's configuration settings;
  • your game's high score table;
  • your progress in a game;
  • data that you need to save for later printing or to use in an external program.
To end our recap, we have completed lines 1 through 5 of the listing below, including the function.

Fundamental
  1. ask “what is your name?”
  2. say “hello” name
  3. ask “when were you born” name “?”
  4. age is getAge(date)
  5. say “Hi name, at the end of 2017 you will be “ age “ years old”
  6. write name, dob, age to text file
  7. clear screen
  8. reset name, dob, age
  9. read name, dob, age from text file
  10. print name “was born on” dob “and so is “ age “ years old”
function getAge (date)
  1. calculate age from date
  2. return age

Writing to a Text File

Let's get our program writing to a text file. FreeBASIC uses the idea of file numbers to refer to files, and uses the FreeFile function to return the next free file number.  This number is in the range of 1 to 255, meaning that you can have a maximum of 255 files open.  Why would you want to do that?  I've got no idea!  After 255, if you try to open one more file you will get a 0 returned, meaning that you have hit your limit (you should get some professional help).

The actual code starts of by creating a variable to hold the file number.  In the Dim section of Fundamental enter the following:

Dim As Integer myFile = 0

An integer is a suitable data type to hold any file number.

Below the section of code that displayed our age in the previous post enter the following:
myFile = FreeFile()
Open "test.txt" for Output as #myFile

In the first line we are setting the new variable to the result of the FreeFile() built in function.  Notice the function FreeFile does not take parameters, unlike getAge() that required a year.  So long as the block of code returns data it is considered a function.

The second line opens a file called test.txt in a mode that allows it to accept data.  The as #myFile specifies the free file number we picked up in the previous line. A file should be opened as close as possible to the time you get the free file number.  Getting a series of free file numbers and then trying to open them in a later part of the program can lead to confusing results.  If test.txt does not exist in the default directory, in this case the directory that holds fundamental.bas, then it is created.  If it does exist the for Output overwrites the data that is already in the file.

The next four lines will write data to the file and finally close the file.  It is important to close files, especially if you use many files in your program:
print #myFile, yourName
print #myFile, Str(yourDob)
print #myFile, Str(getAge(yourDob))
close #myFile

My program looks like the following:
Fundamental writing to a file
If you compile and run the program you should find the new file, test.txt, in your directory.  If you open it with a text editor it will contain the three bits of data you entered during the run.

Let's look at reading the file now.  First off  let's do like magicians and show we have nothing up our sleeves.  Enter the following after the close #myFile line:

cls
yourName = ""
yourDob = 0

The cls command clears the screen and the next two commands clear out the variables we are using.

We will need to create two new string variables called yourFileAge and yourFileDob to hold the age and the dob read from the file.  Go ahead, you should know how to do this.

To read from a file we need to open it for Input then read each line.  Don't forget to close the file when we are done.  Enter the following:

Open "test.txt" for Input as #myFile
Line Input #myFile, yourName
Line Input #myFile, yourFileDob
Line Input #myFile, yourFileAge
Close #myFile

Let's display the result:

Print yourName + " was born on " + yourFileDob + " and is " + yourFileAge + " years old."

Your program should now look like the following (I won't show the function as that hasn't changed).  Notice I have split the print line over two lines with an underscore character.

Fundamental with file read

Go ahead and run the program.

That's it for the program I described a few posts back.  Fundamental is a simple program but it packs quite a few basic programming ideas ideas.  In future posts we will look at other features of FreeBASIC that will round out methods that can be used in most programs.  We will look at arrays to hold related data, loops to repeat sections of code, and commands that control which bits of code will run.  If there is anything in particular you wish to see covered please leave a comment.
Please feel free to leave a comment and see you in the next post.

7. Arrays, Conditionals, and Loops

I am working on a board game that uses a chess board as its basis.  I want to add items to random squares to represent obstacles. This is a great problem to solve using FreeBASIC and a great problem for us to explore arrays, conditionals, and loops.

Arrays

In earlier posts we worked with variables to hold data. An array is a series of variables that have a common name and can be referenced by an index.  A typical suburban street has a row of houses, each with a numbered letter box. We can specify and exact letter box by giving the street name (variable name) along with its house number (index). The Fender guitar company stamps a unique serial number on each guitar it produces. We can specific the exact guitar by giving the Fender Company (variable name) along with the unique serial number (index).

These are examples of one dimensional arrays.  The index starts at a point and continues from there in one direction only. In FreeBASIC one dimensional arrays are given as variableName(index).

I want to use a grid of squares, ten squares high by ten squares wide. Like the examples above, each square can hold a number or a letter. It's pretty obvious that we have an array however, to specify a square in this grid we need to use two indexes, one for the row and one for the column. If we call the top left square board(1,1), where 'board' is the name of the variable), the next square to the right will be board(1,2), the next will be board(1,3) and so on.  If we now drop down one row from the top left hand square we have board(2,1). 

This is a two dimensional array, it has height and width (a bit like me, though not so much on the height!). Arrays don't stop at two dimensions although it the most common arrays you will find when programming are one and two dimension arrays.

Let's start a new file in FBEdit and enter the following:
/'
======================
Array Test in FreeBasic
Franktic
26 March 2017
======================
'/

Dim As Integer wide = 8
Dim As Integer high = 8

Dim As Integer x = 0
Dim As Integer y = 0


Dim As Integer board( 1 To wide, 1 To high)

After the preamble we have two integer variables that will hold the dimensions of our two dimensional array.  The next two variables will be used as indexes.  I have used x and y for simplicity but you can use whatever you wish.  The last line is where we allocate space for our two dimensional array.  A one dimension array would simply skip the  ', 1 To high' within the brackets.

Random and For Next Loop

I want to put random percentages into each square.  To do that I need to use the Rnd function. Calling this function returns a random number between 0 and 1 so we need to multiply the return of Rnd by 100, as has been done four lines down in the code below:

Randomize, 1

For x = 1 To wide
For y = 1 To high
board(x,y) = Int(Rnd * 100) + 1
Next
Next

Notice that the first line is Randomize, 1.  Without this call FreeBASIC will use a set of random numbers that is repeated with each run.  This is great for testing code but not very helpful if you want a random result each time we run your program. The number after the Randomize sets the algorithm the function uses to generate the random numbers. You can read about it in the FreeBASIC help file. I have set it to 1.

The next bit of code uses two loops to cycle through each column and row and fill in the random numbers. Let's take the second For...Next loop and investigate that first:

For y = 1 To high
board(x,y) = Int(Rnd * 100) + 1
Next

A For..Next loop can be described as:
For an index starting at a point and until it reaches the limit
     Do something
Advance the index

Looking at the code we see that we are looking using the y index starting at 1 and will stop when it reaches the variable 'high', which we set to 8 earlier. Let's walk through a couple of iterations, note that x is already set to 1 the first For Next loop:
  1. The first time the code runs it sets y to 1.
  2. Board (1,1) (x was set to 1 earlier, and y is set to one in this pass of this loop) is given the value of  Rnd * 100.  This is a number from 0 to less than 100.  We want an integer from 1 to 100 inclusive so we set the value to (Rnd * 100) + 1.  The Int() function rounds down our result so we don't end up with a result of 101 percent.
  3. The Next command advances the index to 2 and we start at the beginning of the loop again.
  4. Board(1,2) is now given the percentage.
  5. The Next command advances the index to 3, and we loop again.
  6. The looping continues until y = 8  and we have hit the limit for the Next command.
If we look back to the code above that contains the For x = 1 to wide command we can see that we have two For Next loops, one within the other.  This is the typical way of using a for next loop for a two dimensional array.  The outside loop advances once for each complete loop sequence of the inside loop.  Once the outside loop has hit its limit it will then move onto the next command after the loop.  That explains the two Next statements, one belongs to the x and one belongs to the y.

Printing Our Results

Let's print the results out so we can use them. We'll enter the following code to print the contents of our squares all on one line:

For x = 1 To wide
For y = 1 To high
Print Str(board(x,y)); "     ";
Next
Next

If you have followed previous posts this bit of code should be easy to understand.

My output looks like this:


The skewed output is a result of the word wrapping on the screen.  If the screen had been extremely wide the whole lot would have appeared on one line.  This is great but it is not very useful because we cannot readily see what square a particular number refers to.  Let's try printing the square reference with each number.

To print the square coordinates in front of each percentage we need to modify the code above as follows:


For x = 1 To wide
For y = 1 To high
   Print Str(x); ", "; Str(y); ": ";Str(board(x,y)); "     ";
Next
Next

This produces the following more useful output:


It's pretty easy to see that the top left hand square, '1,1', contains 63 while the bottom right square, '8,8' , contains 88

I think we can do even better than that.  Let's try make our output more graphical by simulating the array.  First we need to print the top row coordinates.

For x = 1 To wide
Print  Tab(x*5); Str(x);
Next

Print

The Print line within the  For Next loop advances the position of the cursor to five times the value of x.  When x is 1 printing will start at column 5 (ie. 1*5).  When x is two printing will start at column 10 (ie. 2*5).  Str(x) converts the integer value of x so it can be printed. And the semicolon at the end makes sure we don't move down a line with each print statement.  We want to print out the column names all on one line.  Try it without the semicolon to see what happens.  

At the end of the For Next loop there is a single Print statement.  This prints a single empty line so we can space out our output.

Now we want to print the row number along with the results of that row.  To do that use the following code:

For y = 1 To High
Print y;
For x = 1 To wide
     Print Tab(x *5); Str(board(x,y));
Next
Print
print

Next

The first Print statement prints the row number, y.  The next Print line within the second For Next loop is similar to the code we used previously except we are now printing the contents of the square. We then use two print statements to give us to blank lines between each row.  Our output looks like this:


Mission Accomplished!

Conditionals

One last embellishment that I want to do to the output is to only show squares that have a particular interest to me.  Let's say the 8 x 8 square represents a piece of grassland.  Each square has a 20 percent chance of having a tree in it.  I know the rest contains grass so I want the output to only show squares that have a value of 20% or less.

To do this I want to create a constant that will hold our percentage chance of the tree being present.  A constant is very similar to a variable but its contents does not change; it is constant.

Below the variables section add the following line:

Const obstacle = 20

The code to just print out  the squares with contents less or equal to 20 ( the <= symbol means less than or equal) is given below:

For y = 1 To High
Print y;
For x = 1 To wide
If board(x,y) <= obstacle Then
Print Tab(x *5); Str(board(x,y));
End If
Next
Print
print
Next

The real magic occurs in the section starting with the If keyword.  The If is know as a conditional because the following code will only be executed if the condition has been met.  In this case the line

If board(x,y) <= obstacle Then

tells the computer that If the contents of the square board(x,y) is less or equal to the value of obstacle, <= obstacle then run the next bit of code.  The next bit, as we can see simply prints out the contents of the square.  The whole lot is rounded off by an End If statement to tell the computer that the conditional statement is over and it can resume normal duties.  Let's consider, for a moment, if the contents of the square were greater than or equal to 21, the value of obstacle, the condition would not be met and the program would not print the square's contents.

Our output now looks like this:


For your own amusement you can further improve the program by allowing the dimensions of the board to be changed for each run.  You could do this by asking the user for the x and y values before declaring the variables.  Similarly you could change the percentage of the obstacles by also asking for the percentage chance.  Give it a try.

The whole program

The whole program with some additional comments is given below.

/'
======================
Array Test in FreeBasic
Franktic
26 March 2017
======================
'/
Dim As Integer wide = 8
Dim As Integer high = 8

Dim As Integer x = 0
Dim As Integer y = 0

Const obstacle = 21

Dim As Integer board( 1 To wide, 1 To high)

Randomize, 1

'Fill the array with random numbers
For x = 1 To wide
For y = 1 To high
board(x,y) = Int(Rnd * 100) + 1
Next
Next

'Print out top row
For x = 1 To wide
Print  Tab(x*5); Str(x);
Next

Print

'Print out remaining rows
For y = 1 To High
Print y;
For x = 1 To wide
'print contents of square if it has an obstacle
If board(x,y) <= obstacle Then
Print Tab(x *5); Str(board(x,y));
End If
Next
Print
print
Next

Sleep
Please feel free to leave a comment and see you in the next post.